
Making your PowerPoint slides digitally accessible provides an inclusive learning experience for all students. Although there are overlaps between Word and PowerPoint, there are some unique considerations that are critical for ensuring PowerPoint usability and accessibility.
Why use PowerPoint?
First, consider why you are presenting the information in PowerPoint. Ideally, PowerPoint slides are a visual aid to accompany a spoken presentation — in person, over videoconferencing or recorded with Panopto or VoiceThread. However, slides are often distributed as a supplemental handout to that presentation or as a stand-alone resource. As you are designing your slides, keep in mind how your audience will experience them, as each audience will have different potential barriers to accessibility.
If you are creating a handout that will not accompany a lecture (in-seat or recorded), you are strongly encouraged to use Canvas Pages or Microsoft Word instead.
Slide layouts
One critical step toward PowerPoint accessibility is the use of slide layouts. Used correctly, layouts will ensure information on the slides has the correct heading structure and reading order.
Most slide layouts include a slide "title," usually at the top of the slide. They also typically contain one or more "placeholder" areas where you add content like lists, images and tables to each slide.
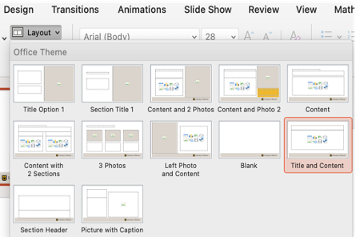
If you start with a blank slide and add your own text boxes for the title, content and so forth, the screen reader will not automatically detect the semantic intent of these elements; in other words, it won't "know" that your title is supposed to be a title, and it will assume the slide has no title.
Titles
There are two key principles for titling PowerPoint slides:
- Every slide must have a title.
- Every slide title must be unique.
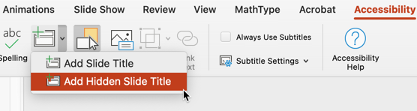
If you want to present a slide without a title, you need to add a hidden title — this will not be visible to anyone viewing your presentation, but a screen reader will detect it.
You can add a hidden slide title from the Accessibility menu. Choose Slide Title, then Add Hidden Slide Title.
If you are covering a topic across multiple slides and struggling to create a unique title for each, it is acceptable to add “Part 1,” “Part 2,” and so forth to those slide titles.
Slide reading order
A unique accessibility criterion for PowerPoint slides is slide reading order, or the order in which the elements on the slide are presented to the reader. You need to ensure that the order is logical. Again, using one of the provided slide layouts helps ensure the intended reading order.
To check (and correct) the reading order, go to Home > Arrange > Selection Pane.

The Selection Pane will appear in the right-hand sidebar. The pane will show every object on the slide. Highlighting an object in the pane will also highlight it in the slide.

IMPORTANT: The reading order for the objects on your slide is bottom to top. Think of the objects on a slide as layers. Just as the first layer you put on a cake is the one at the bottom, the same is true for the layers on your slide.
If you need to fix the reading order of your slide, you can drag and drop the elements within the selection pane into the correct order.
Lists
See Accessibility Skills: Lists to learn how descriptive links support accessibility.
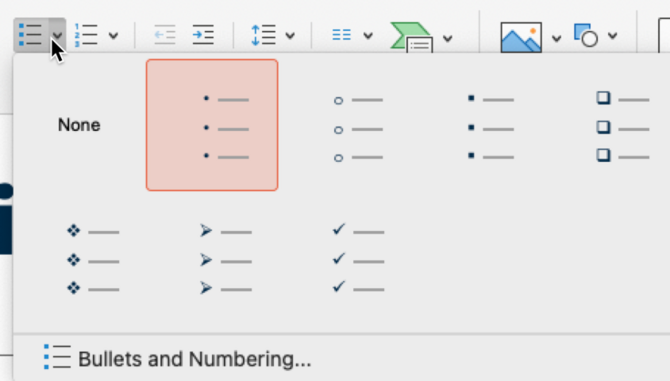
Most PowerPoint templates will guide you in creating lists. You can select different list styles from the Home ribbon. Here are the options for unordered lists:
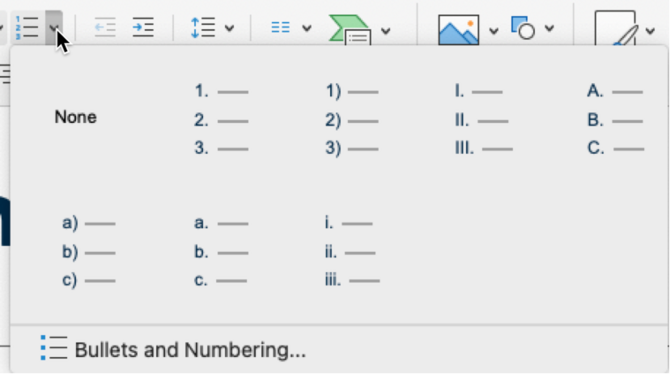
Here are options for ordered lists:
More guidance for adding bullet points to your slides:
- Keep your bullet points concise; try to limit each point to a single line.
- Limit the number of points per slide to 3-5. If you have more points to make on the topic, continue on to the following slide.
Links
See Accessibility Skills: Descriptive Links to learn how descriptive links support accessibility.
Non-descriptive link text can be problematic for those using assistive technology. However, because PowerPoint is intended to be displayed to an audience, you might need to present the URL to your audience so they can access the information later; they won't be able to just click or tap to access it. In this case, present a title or other description of the URL followed by the URL. Deactivate the hyperlink.
If the URL is long, options for sharing it on the slide include using a URL shortening service (such as Bit.ly or TinyURL) or providing a handout with the links. A quick response (QR) code is also an effective way to share links with an audience, but provide an alternative as well. Although a visually impaired person's device would be able to scan the QR code and retrieve the link, the user may have difficulty accessing the code in the first place.

Tables
See Accessibility Skills: Tables to learn how correctly structured tables support accessibility.
Keep tables in PowerPoint brief and simple. Remember that your audience will likely not have time to absorb all the data in a complex table before you move on to the next slide.
To ensure that your table has defined headers, select the table and then select Table Design in the ribbon. Header Row should be checked.

IMPORTANT: Many of the table templates in PowerPoint do not provide sufficient color contrast. If you insert one of these templates, you might need to adjust some of the colors to provide higher contrast.
Images and alternative text
See Accessibility Skills: Images and Alternative Text to review the accessible use of images.
As with other documents, it is good practice to add alternative text to your PowerPoint images, especially if you will make your slides available as a handout.
To add your alt text, right-click the image and select Edit Alt Text or select Picture Format > Alt Text. The Alt Text pane opens.

Because PowerPoint is intended to be a visual medium that accompanies spoken narrative, your "alternative text" should also include verbal descriptions of your images in that narrative. Whether you are creating a recorded presentation (e.g., VoiceThread or Panopto) or speaking to an in-seat class, do not just gesture at your slides and state, "You can see this, and this here, and this here." For example, if you are presenting an equation that students must know, state the full equation out loud. If you are presenting a chart, diagram or infographic, highlight the key features.
Visual design principles for PowerPoint
Following these guidelines will make your presentations more accessible to everyone, but especially anyone with disabilities.
- Use an adequate font size — at least 18 points for the body of the slide.
- Choose sans serif fonts. Arial and Helvetica are the most commonly available sans serif fonts.
- Avoid using animated transitions between slides.
- Limit the number of images per slide, especially if image detail is critical, such as graphs. Do not try to fit so many images onto a slide that viewers cannot see the details. Again, opt for more slides and fewer images per slide so you have plenty of space to display the image.
- In general, avoid crowding the slide with text and/or images. Allow white space.
- Choose quality images. Avoid those that are blurry or pixelated.
If you find yourself struggling to limit the amount of content in your PowerPoint slides, consider the following:
- Remember that your slides should complement an accompanying narrative presentation. Use the slides to summarize your key points and then elaborate on those points in your lecture or speech.
- If you intend your slides to be the primary information source for your audience, choose an alternative format, such as a page in your Canvas site or a Word document.
Checking your PowerPoint slides for accessibility
There is a lot to keep in mind when creating digitally accessible Microsoft documents. Luckily, the Microsoft Accessibility Checker can help you find and address issues in documents you've created previously (before learning about accessibility). Even after digital accessibility has become a habit, checking your work is a wise final step before sharing your documents with others.
To access the Microsoft Accessibility Checker, go to Review > Check Accessibility.

The resulting report will show you where the errors can be found. When you select an item, the checker will explain why the issue is problematic and how to fix it.
Errors, warnings and tips
The Microsoft Accessibility Checker will flag issues as errors, warnings or tips.
Errors include:
- Missing alternative text for images or other objects.
- Missing table headers.
- Missing slide titles.
Warnings include:
- Split, merged or nested cells in a table.
- Lack of sufficient color contrast.
- Check for logical reading order in PowerPoint.
Tips include:
- Slide titles that are not unique.
Issues not addressed
The Microsoft Accessibility Checker does not address semantic lists (numbers and bullets) or descriptive link text. You will need to check your documents yourself to find these — and perhaps enlist a colleague to "peer review" each other's work for accessibility.
Related sprints

Sprint 1.B Designing digitally accessible documents
This sprint will guide you through the core skills of digital accessibility and how to apply those skills in documents.

Sprint 1.G Presentations perfected
Review best practices and work with a designer to create a new (or modified) presentation that captures attention and effectively communicates information.
Learn more
- Word and PowerPoint Accessibility Evaluation Guide. WebAIM.
- Creating Accessible Documents. National Center on Creating Accessible Materials.
- From Microsoft | Create accessible PowerPoint presentations