

Adding a user to a group
Faculty can request a group by sending an email to showmeai@missouri.edu.
- Verify with the user that they have previously logged in to Show-Me AI. Users must have logged into Show-Me AI at least once before they can be added to a group.
If your group has been created, hover over the group name in the assistants tab and click the purple gear icon (see Fig. 1).
Image
Figure 1: The location of the purple gear icon when hovering over the desired group.
- On the group screen, ensure the group you want to manage is selected in the drop down.
- Click the “Group Management” button.
Click the “Add Users” button (See Fig. 2)
Image
Figure 2: View of the “Group Management” screen.
- In the “Enter usernames/emails” box, type or paste the user’s complete email address ending with the “@umsystem.edu” domain.
- If entering multiple email addresses, separate each address with a comma and no space.
Click on the green check mark next to the “Add Users” button when finished (See Fig. 3).
Image
Figure 3: View of the “Add Members” screen.
- Users will be given read access by default which allows them to view and interact with assistants you’ve created and shared.


Editing a user’s access level
The access level assigned to a user controls what they are allowed to do within the group.
- Read access allows users to view and interact with assistants shared to the group. This is the default level of access given to users.
- Write access allows users to create and edit assistants in addition to viewing and interacting with them. This level is ideal for allowing students to create assistants (i.e., as part of an assignment) and to share them with the group.
- Admin access allows users full administrative control to manage group members and even delete the group. Reserve this level for instructors and teaching assistants.
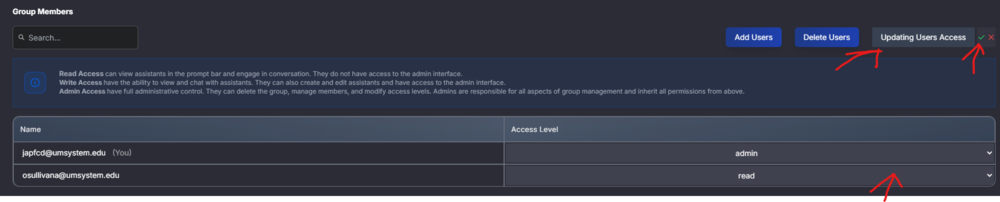
- Once the user is added to the group, click the “Update Users Access” button from the “Group Management” screen (See Fig. 2, above).
- In the “Access Level” column, click the drop-down menu next to the user whose access you would like to change.
- Select the desired access level from the list of choices. Admin access should only ever be assigned to instructors or teaching assistants.
Click the green check mark next to the “Updating Users Access” button to save changes (See Fig. 4).
Image
Figure 4: View of the “Group Management” screen when the “Updating Users Access” button is toggled.
Removing a user from a group
- Navigate to the “Group Management” screen (See Fig. 2, above).
- Click the “Delete Users” button.
- Check the box next to the user(s) you would like to remove.
Click the green check mark next to the “Delete Users” button to save changes and remove the selected user(s) from the group (See Fig. 5).
Image
Figure 5: View of the “Group Management” screen when the “Deleting Users” button is toggled.
