
Faculty wishing to easily share custom AI assistants with their students can request a group by sending an email to showmeai@missouri.edu. A course-based group allows faculty to have more control over how AI is used in their class. Faculty can see the prompts used by students, explore how students interact with their assistants and evaluate the end result of those interactions.
Getting started
- Request a group by sending an email to showmeai@missouri.edu.
- Once the group for your class has been created, you can find it in the assistants tab. Your group will be named similar to your course name in Canvas.
Accessing the group dashboard
There are two ways to access a group dashboard.
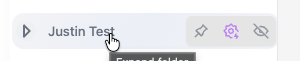
Hover over the name of one of your groups and click on the purple gear icon (See Fig. 1).
Image
Figure 1: The location of the purple gear icon when hovering over the desired group.
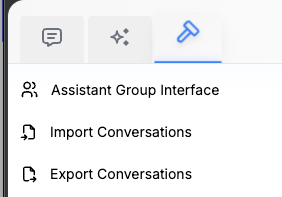
Click on the hammer icon, then on “Assistant Group Interface” (See Fig. 2).
Image
Figure 2: The view of the menu after clicking the hammer icon.
Navigating your group dashboard
The dashboard displays a lot of information for your selected group (See Fig. 3). Selecting an assistant under that group will allow you to edit the assistant, see conversations that students have had with it, see category distribution based on key words you have chosen and see other pieces of data, such as average prompts per conversation.
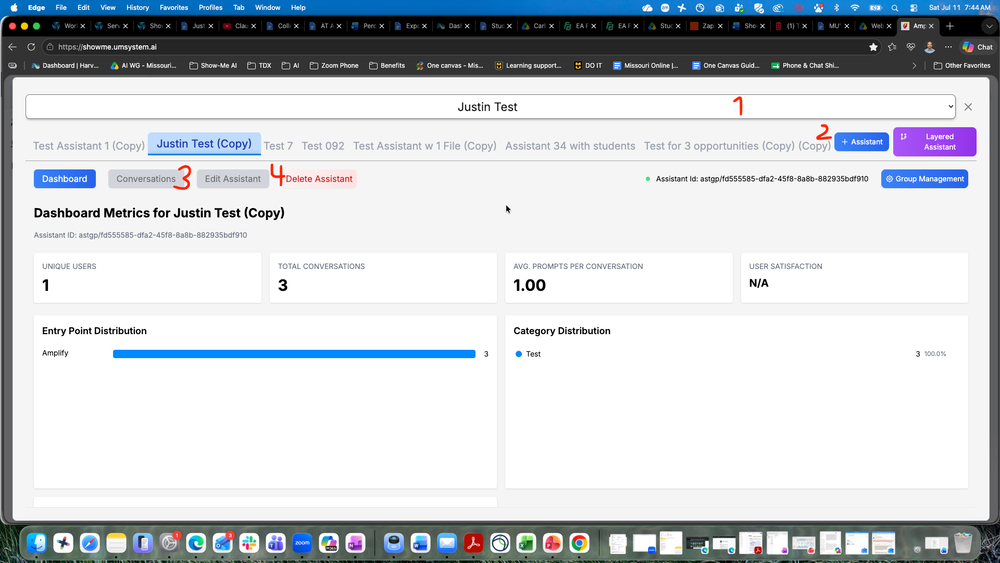
Figure 3: View of the group dashboard.
- Group selection. The drop-down menu at the top of the dashboard allows you to navigate between your groups. The group name displayed here is the group that is currently selected.
- New assistant. The “+ Assistant” button will create a new assistant within the selected group. Once created, assistants will appear as tabs to the left of the “+ Assistant” button.
- Conversations. Clicking the “Conversations” button allows you to see all of the conversations that have taken place with the selected assistant.
- Edit assistant. This button allows you to edit the selected assistant.
Creating an assistant within a group
Assistants are the key resource shared within groups, and groups are how your students will gain access to interact with them. With custom assistants, you can see each student’s conversation with AI and control how the AI interacts with them based on the instructions you give it.
To get started, click on the “+ Assistant” button within your group (See Fig. 4).
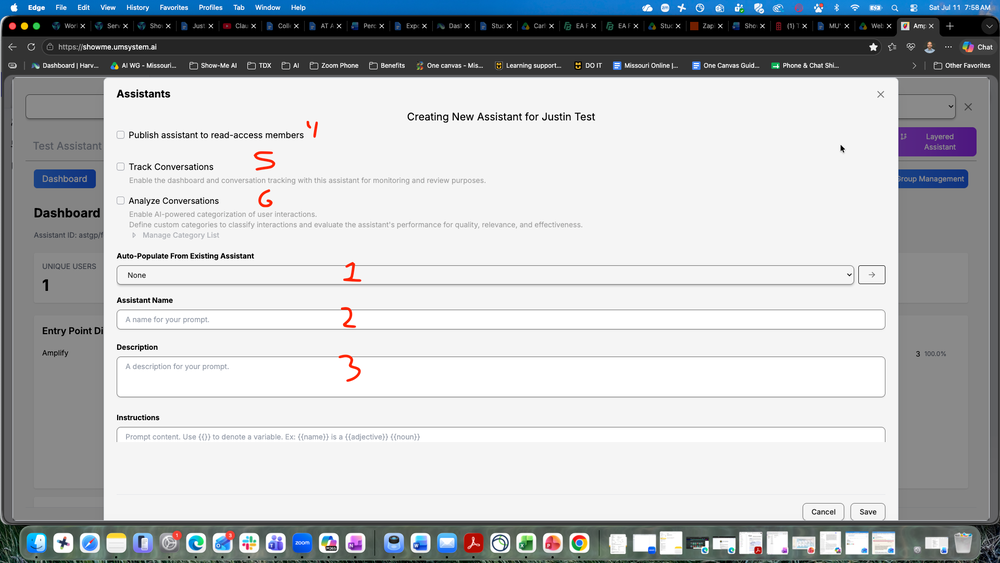
Figure 4: View of the screen when creating a new assistant.
- Auto-populate. If you have already created an assistant that you would like to use in your group, click this drop down and select it. Then click the arrow pointing right.
- Assistant name. Give your assistant a name or edit the existing one if you auto-populated from an existing assistant.
- Description. You have the option of giving your assistant a description so users understand its intended purpose. The description has no effect on how the assistant acts.
- Publish assistant. When you are ready for your students to see this assistant, check the box next to “Publish assistant to read-access members.” This option can be unchecked at any time to unpublish the assistant.
- Track conversations. Check the box next to “Track Conversions’ to enable conversation tracking for this assistant. This option will allow you to see every interaction students have with this assistant only. Student conversations can be found by selecting this assistant on the group dashboard, then clicking on the “Conversations” button (See Fig. 3).
Analyze conversations. Check the box next to “Analyze Conversations” to enable key word or phrase tracking for your assistant. Click on "Manage Category List and add the words or phrases you would like to track. The analyzed results will appear on the group dashboard.
Image
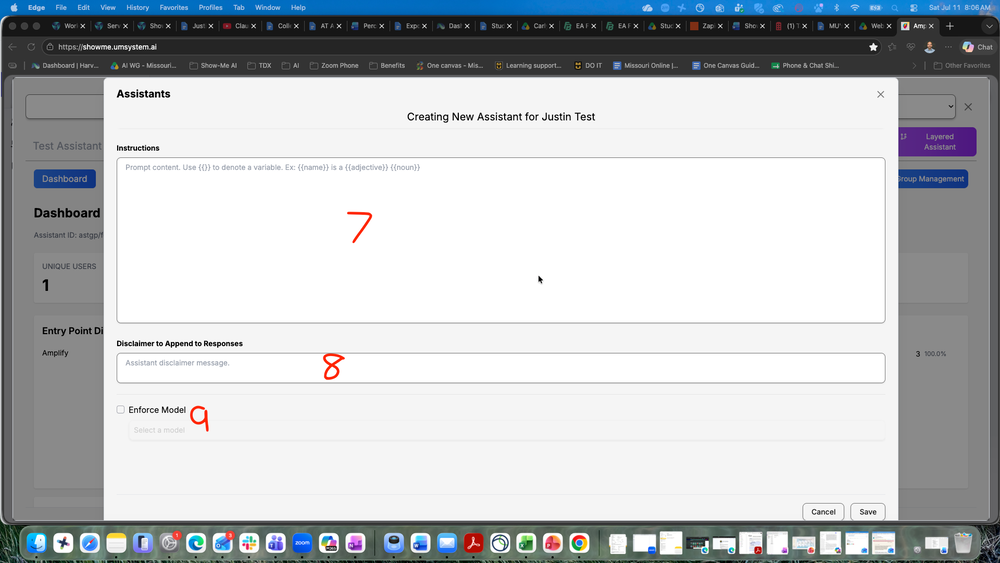
- Instructions. The details entered into the instructions text box are the heart of your assistant. This is where you tell it what to do, how to interact and any restrictions you may have. Be as detailed as possible.
- Disclaimer. The text entered into the disclaimer box will appear at the bottom of any responses given by this assistant. It can be useful to include a warning for students not to fully trust AI results or to give your contact information if they have questions.
Enforce model: Check the box next to “Enforce Model” to enforce the use of the specific AI model that you select. This feature is helpful to compare results of responses between students since they will all use the same AI model.
File uploads for your assistant
Image
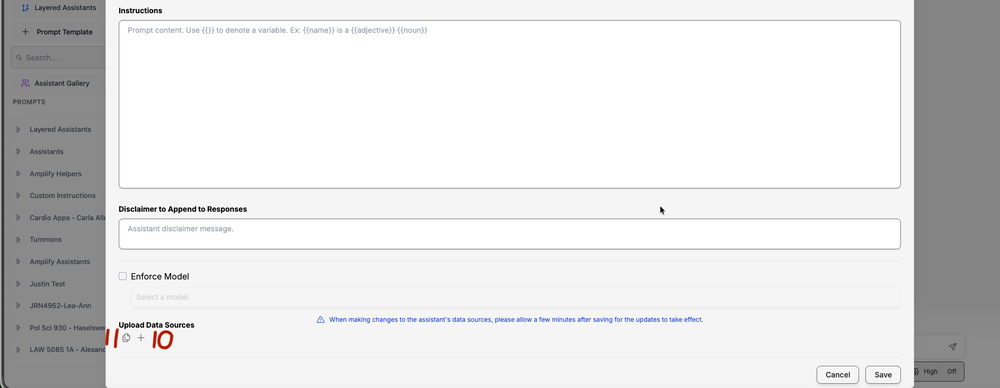
- New upload. Click the “+ Upload” button to upload a file from your computer into your assistant for the AI to reference. You can upload multiple files. Files uploaded here will also be available for adding to other assistants.
- Manager files. The stacked documents icon will bring up a file manager system allowing you to see files you have previously uploaded to Show-Me AI and select them for use in your assistant. This saves time if you want to use the same file for multiple assistants.
- Save. The “Save” button saves your current progress.